Quick Pickled Brussels Sprouts: 15-Minute Meal-Prep
Easy Pickled Brussels Sprouts Recipe
Ah, Brussels sprouts! They often get a bad rap, don’t they? But trust me, they are a delightful and versatile veggie that can take your snacks, sides, and even salads to the next level! Today, I’m here to share a recipe that’s near and dear to my heart: Easy Pickled Brussels Sprouts. These tangy, crunchy bites are perfect for adding a zesty crunch to any meal or enjoying straight from the jar. So grab your aprons and let’s dive in!
A Personal Story
Growing up, my family had a garden overflowing with vegetables every summer, and among those were the most beautiful Brussels sprouts. I remember standing next to my grandmother, who’d methodically pick and wash them before we’d sit down to make delicious pickles. Those crisp, crunchy sprouts were always a hit at family gatherings, served alongside our holiday feasts or simply as snacks with a good dip. Fast forward a few years, and I’ve taken that memory and infused it with modern flavors to create something that brings both nostalgia and excitement to the table.
There’s something special about enjoying food with a story behind it, and these Easy Pickled Brussels Sprouts encapsulate those good times while bringing a little modern twist to our lives. Let’s make some memories together!
Ingredients
To get started, here’s what you’ll need:
-
2 pounds Brussels Sprouts
Fresh is always best! Look for sprouts that are bright green and firm. If you can’t find Brussels sprouts, green beans or cauliflower can make for a fun substitute. -
5 cloves garlic (1 per jar)
Garlic packs a punch with its flavor and aroma. Feel free to use more or less, depending on how garlicky you like it! For a twist, consider using shallots for a gentler flavor. -
5 hot cayenne peppers
I used dried for a milder kick, but fresh works beautifully too! If heat isn’t your thing, swap it out with sliced bell peppers or a pinch of red pepper flakes. -
5 cups vinegar
Use white vinegar for a classic, tangy flavor, or experiment with apple cider vinegar for a touch of sweetness. You could also try balsamic or red wine vinegar for a different flavor profile! -
5 cups water
Nothing fancy here—just plain ol’ water. You could use vegetable or chicken broth if you want to infuse extra flavor into the brine. -
7 tablespoons pickling salt
This can be substituted with kosher salt, but avoid table salt since it can contain iodine and anticaking agents that might affect the pickling process. -
Spices (optional)
Think about adding whole black peppercorns, mustard seeds, or dill for extra flavor. Let your creativity flow!
Step-by-Step Instructions
Now that you’re all set with ingredients, let’s get cooking!
1. Prepare the Brussels Sprouts
Start by rinsing the Brussels sprouts and trimming the stems. Cut the larger sprouts in half so they pickle evenly. Feel free to channel your inner chef and slice them into quarters for more flavor infusion!
2. Sterilize Your Jars
Clean, sterilized jars are essential for pickling. Boil your jars and lids in water for about 10 minutes or run them through the dishwasher. This little step helps prevent any unwanted bacteria from ruining your pickles.
3. Boil the Brine
In a large pot, combine the vinegar, water, and pickling salt. Bring that mixture to a rolling boil while stirring occasionally until the salt dissolves. This is my favorite part — the smell of the vinegar wafts through the kitchen, like a warm hug from a pickle lover!
4. Pack the Jars
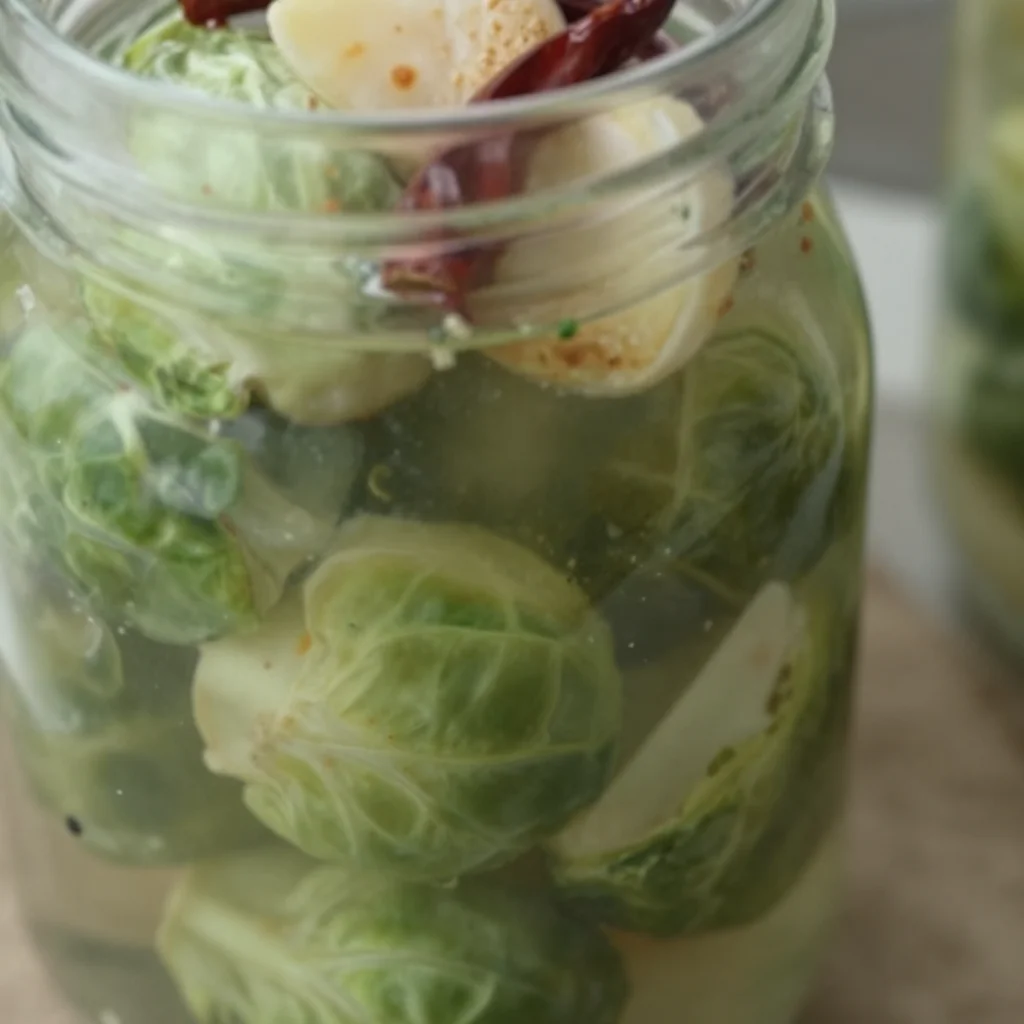
This is where it gets visual! Place a clove of garlic and a cayenne pepper in each jar (one garlic and one pepper per jar). Then, pack the Brussels sprouts tightly, standing them up if you can. You want to maximize those precious veggies in each jar!
5. Pour the Brine
Carefully ladle the hot brine over the Brussels sprouts, ensuring that they’re fully submerged. Leave about half an inch of headspace at the top. This step is critical for flavor and preservation!
6. Seal and Cool
Wipe the rims of the jars with a clean cloth to remove any residue that might prevent a proper seal. Secure the lids tightly and let the jars cool to room temperature. This may take a bit, but the anticipation is half the fun!
7. Refrigerate
Once cooled, place the jars in the refrigerator. Allow them to pickle for at least 24 hours before diving in. The longer they sit, the more intense the flavor, so try to wait a week if you can!
Serving Suggestions
After a day’s patience (or a week’s), it’s time to indulge! Serve these pickled Brussels sprouts on a charcuterie board, atop a fresh salad, or alongside grilled meats. They also make a fantastic tart topping for tacos or sandwiches. Stack them high for that vibrant crunch in every bite!
Recipe Variations
Now, let’s get creative! Here are some delightful twists and variations to mix things up:
-
Spicy Kick: Add slices of fresh jalapeño or crushed red pepper flakes alongside the garlic for an extra layer of heat.
-
Herb-Infused: Toss in fresh dill or thyme into the jars for a fragrant herbaceous touch.
-
Sweet & Sour: Mix in a couple of tablespoons of sugar to balance the acidity. It’ll help mellow the tanginess and give a delightful sweet punch!
-
Flavor Bombs: Consider adding whole spices like coriander seeds, star anise, or even ginger slices to enrich the brine.
-
Asian Flair: Add a splash of soy sauce, sesame oil, and a sprinkle of sesame seeds to the brine for an Asian twist that’ll have you coming back for more.
Chef’s Notes
Pickling can be a pretty forgiving culinary adventure! Don’t stress too much about exact measurements—feel free to adjust based on your taste preferences. If you prefer crunchier vegetables, reduce the boiling time slightly or give them a shorter pickling duration.
One time, I got a little adventurous and added leftover herbs from my garden into the jar, and boy, did that make a difference! Kitchen experiments often lead to delicious surprises, so trust your gut and have fun with it.
FAQs and Troubleshooting
1. Can I use different kinds of vinegar?
Yes! While white vinegar is traditional, you can try apple cider, rice, or even malt vinegar for different flavor profiles.
2. My sprouts turned mushy—what went wrong?
Mushy sprouts usually mean overcooking. Make sure to not boil them too long and use fresh, crisp sprouts. Pickling is all about that fabulous crunch!
3. How long will these keep in the fridge?
Generally, your pickled Brussels sprouts will last for about 3 weeks in the refrigerator. I bet they’ll be gone way before that, though!
4. Can I double the recipe?
Absolutely! Just make sure to adjust the size of your pots and the number of jars accordingly. Always keep the brine ratio the same for best results!
Nutritional Info (Optional)
Per serving (approximately 1 oz, not including additional seasonings)
- Calories: 15
- Total Fat: 0g
- Sodium: 300mg
- Carbohydrates: 3g
- Fiber: 1g
- Protein: 1g
Pickled Brussels sprouts offer a delightful, low-calorie snack brimming with flavor, vitamins, and minerals.
And there you have it! Easy Pickled Brussels Sprouts that not only elevate your meals but also tell a little story from my kitchen to yours. I hope you enjoy this recipe as much as I do, and remember to embrace your inner chef. It’s all about having fun and making memorable moments in the kitchen. Happy pickling! 🥗✨
PrintEasy Pickled Brussels Sprouts
Tangy and crunchy pickled Brussels sprouts that add a zesty crunch to meals or can be enjoyed straight from the jar.
- Prep Time: 15 minutes
- Cook Time: 30 minutes
- Total Time: 45 minutes
- Yield: 4 servings 1x
- Category: Side Dish
- Method: Pickling
- Cuisine: American
- Diet: Vegan
Ingredients
- 2 pounds Brussels sprouts
- 5 cloves garlic
- 5 hot cayenne peppers
- 5 cups vinegar
- 5 cups water
- 7 tablespoons pickling salt
- Spices (optional)
Instructions
- Prepare the Brussels sprouts by rinsing and trimming the stems. Cut the larger sprouts in half.
- Sterilize your jars by boiling them in water for about 10 minutes.
- Boil the brine by combining vinegar, water, and pickling salt in a large pot and bringing to a rolling boil.
- Pack the jars with a clove of garlic and a cayenne pepper, then pack the Brussels sprouts tightly.
- Pour the hot brine over the sprouts, ensuring they are submerged.
- Seal the jars tightly and let cool to room temperature.
- Refrigerate for at least 24 hours before consuming for the best flavor.
Notes
Feel free to adjust the spices and ingredients based on your taste preferences. Try waiting a week for intense flavor!
Nutrition
- Serving Size: 1 ounce
- Calories: 15
- Sugar: 0g
- Sodium: 300mg
- Fat: 0g
- Saturated Fat: 0g
- Unsaturated Fat: 0g
- Trans Fat: 0g
- Carbohydrates: 3g
- Fiber: 1g
- Protein: 1g
- Cholesterol: 0mg
Keywords: pickled, Brussels sprouts, quick pickles, tangy vegetables