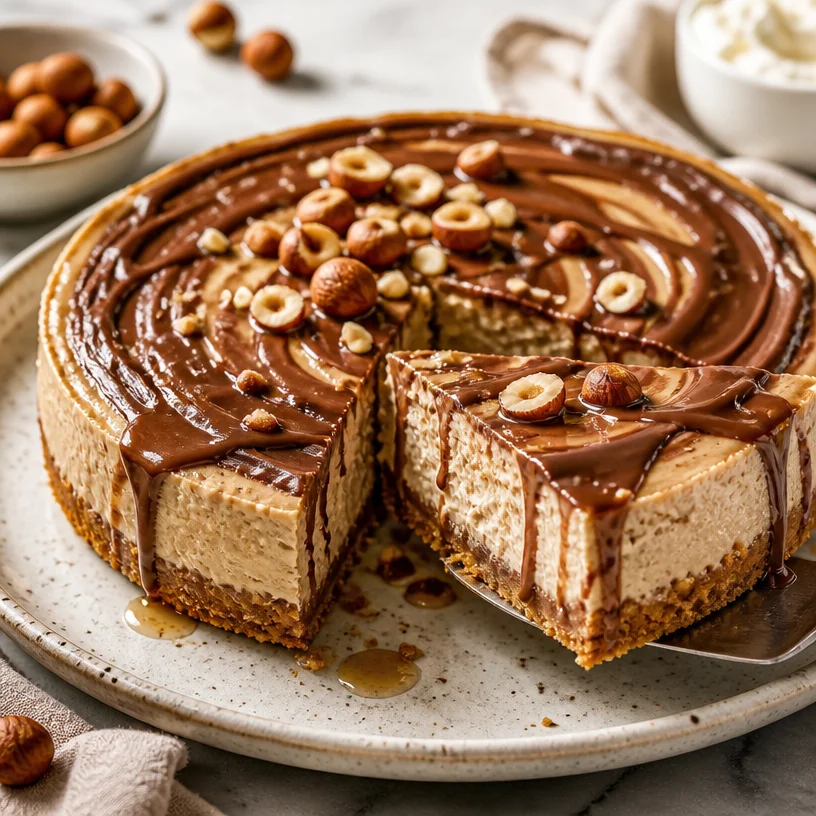
Protein Nutella Maple Cheesecake
Protein Nutella Maple Cheesecake: A Slice of Indulgence without the Guilt
Hey there, fellow food lovers! I’m Camille, and today, I want to take you on a delightful journey of creating one of my absolute favorite sweet treats—Protein Nutella Maple Cheesecake! 😍 This isn’t just any cheesecake; it’s a guilt-free indulgence, packed with protein, and filled with irresistible flavor.
A Sweet Trip Down Memory Lane 🍰
Before diving into the recipe, let me share a little story that makes this cheesecake even more special to me. Growing up, my family had a tradition of gathering around the table for dessert every Sunday evening. No matter how busy our week was, we made time for a little sweet indulgence while catching up about our lives.
My mom, an incredible home chef, often made a classic cheesecake that we all adored. However, I always craved a twist on the traditional recipe. One evening, I decided to surprise my family by experimenting with Nutella and adding a protein punch, knowing everyone could enjoy it without the usual guilt that comes with rich desserts. The combination of creamy cheesecake, the heavenly taste of Nutella, and the maple sweetness was celebrated with cheers and happy faces. From that day on, it became a staple in our house.
Fast-forward to today—this Protein Nutella Maple Cheesecake inspired by those sweet memories has transgressed into a delicious creation. Ready to make some beautiful memories of your own? Let’s get cooking!
Ingredients: Gather Your Goodies 🥣
Here’s what you’ll need to make this decadent yet wholesome cheesecake:
-
Greek Yogurt or Cottage Cheese
Packed with protein! Greek yogurt provides a creamy texture, while cottage cheese can give a wonderful rustic feel. If you’re dairy-free, try silken tofu—it’s a fantastic substitute! -
Protein Powder
Choose your favorite flavor—vanilla works great! This adds protein and can alter the flavor. Plant-based options are readily available, but check for sweetener content if preferred. -
Light Cream Cheese
This is what gives the cheesecake its rich, creamy body. Opt for reduced-fat versions for a lighter take, or use mascarpone for an ultra-luxurious texture! -
Seasonal Flavor Ingredients
Think cinnamon for fall or fresh berries in summer! This is your chance to play with flavors. Feel free to add a splash of vanilla extract or a hint of orange zest for extra zest. -
Sweetener
Honey, maple syrup, or agave nectar work perfectly here. You can adjust based on your sweetness preference—just taste as you go!
Step-by-Step Instructions: Let’s Get Baking! 👩🍳
Ready? Let’s whip up this gorgeous cheesecake!
-
Prep Your Pan
First, grab an 8-inch springform pan. The springform design makes it easy to release the cheesecake later! Line the base with parchment paper for an even smoother release.Chef Tip: Always grease the sides lightly with cooking spray to prevent sticking!
-
Mix Your Base
In a large mixing bowl, combine 1 cup of Greek yogurt or cottage cheese and 1 package (8 oz.) of light cream cheese. Use a hand mixer or a whisk to blend them until nice and creamy.Chef Commentary: Mixing at room temperature helps achieve a smoother consistency!
-
Incorporate Protein Powder
Add in your protein powder (about ½ cup) and blend until fully combined. This will make the cheesecake rich and keep you full longer! -
Sweeten It Up
Drizzle in ¼ cup of maple syrup or your favorite sweetener. Taste and adjust according to your preference. If you want it sweeter, don’t hesitate to add a little more! -
Season It Right
If you’re using any seasonal flavors, add them now! Toss in half a teaspoon of cinnamon or a splash of vanilla for a personal touch. -
Strawberry Layer (Optional)
If you want a fruit layer, thinly slice up some strawberries and toss them in honey. Layer this at the bottom of the pan for a delightful surprise! -
Pour and Smooth
Once everything is deliciously mixed, pour your filling into the prepared pan. Smooth the top with a spatula to create an even surface. -
Bake to Perfection
Preheat your oven to 350°F (175°C) and place your cheesecake in for about 30-35 minutes. Check for a gently jiggly center—this means it’s perfectly baked!Chef Hack: If you want that dreamy creamy texture, consider using a water bath! Wrap the pan with foil and place it in a larger baking dish filled with water.
-
Cool and Chill
Let your cheesecake cool to room temperature, then refrigerate for at least 3-4 hours, preferably overnight. This allows all the flavors to meld beautifully! -
Nutella Drizzle
Right before serving, melt about ½ cup of Nutella in the microwave for 15-20 seconds. Stir until smooth and drizzle over the chilled cheesecake for THAT WOW moment!
Serving Suggestions: Plate It Up 🍽️
When you’re ready to serve your masterpiece, release the sides of the springform pan. Slice it up and serve it with a side of fresh berries or a dollop of whipped cream! If you’re feeling adventurous, scatter some crushed nuts or a sprinkle of sea salt on top for the perfect sweet-and-salty contrast.
Recipe Variations: Get Creative! 🌈
-
PB&J Twist: Swirl in some natural peanut butter and a fruity jam for a delightful take on the classic combo.
-
Caramel Drizzle: Instead of Nutella, opt for salted caramel for an equally indulgent experience!
-
Fruit Spectacular: Go seasonal with whatever fruit is fresh—strawberries, blueberries, or even caramelized peaches.
-
Chocolate Delight: Mix cocoa powder into the filling for a chocolate cheesecake experience!
-
Vegan Version: Replace cream cheese with blended cashews and nut yogurt. Ensure your protein powder is plant-based too!
Chef’s Notes: The Story Behind the Recipe 🥄
I’ve made this cheesecake hundreds of times (okay, maybe closing in on thousands!), and each iteration feels like a joyful new adventure. I find that every season calls for a new flavor, and I love inviting friends over to see how they interpret the recipe, too.
One time, a friend brought bananas; we sliced them thin and layered them on top before the final Nutella drizzle. Absolute game-changer! So, don’t be afraid to push the envelope—get creative!
FAQs and Troubleshooting: Let’s Clear the Air! 🔍
-
Why did my cheesecake crack?
Don’t worry; it happens! Overbaking can cause cracks. Keep an eye on it—an underbaked cheesecake is better than an overbaked one! -
Can I freeze the cheesecake?
Absolutely! Wrap it tightly in plastic wrap and foil. It should last about a month. Let it thaw overnight in the fridge before serving. -
How do I know it’s done baking?
It should be set around the edges but slightly jiggly in the center. It will continue to set as it cools! -
Can I substitute the protein powder?
Sure! Feel free to use collagen powder or a different flavored protein blend. Just keep track of your sweetener as some flavors can be sweeter than others!
Nutritional Info: Enjoy with Confidence!
While I don’t always dive into numbers, I want you to know that this cheesecake is packed with protein while being relatively low in sugar! Each slice is a treat you can feel good about enjoying.
And there you have it, friends! Your very own Protein Nutella Maple Cheesecake, perfect for impressing guests or simply treating yourself. Embrace the flavors, enjoy the process, and don’t forget to share the love! Happy baking and let’s make some memories together at the Crunchy Table! 🥗✨
Be sure to tag me with your creations—you can find me on my social media for more cooking tips and flavorful fun! 🍽️💚
PrintProtein Nutella Maple Cheesecake
This Protein Nutella Maple Cheesecake is a guilt-free indulgence, packed with protein and filled with irresistible flavor, perfect for a delightful treat.
- Prep Time: 15 minutes
- Cook Time: 35 minutes
- Total Time: 210 minutes
- Yield: 8 servings 1x
- Category: Dessert
- Method: Baking
- Cuisine: American
- Diet: Vegetarian
Ingredients
- 1 cup Greek Yogurt or Cottage Cheese
- 1 package (8 oz.) Light Cream Cheese
- ½ cup Protein Powder
- ¼ cup Maple Syrup or Sweetener of choice
- Seasonal Flavor Ingredients (e.g., cinnamon, vanilla extract)
- Optional: Strawberries for layering
Instructions
- Prep your pan by greasing an 8-inch springform pan and lining the base with parchment paper.
- Mix your base in a bowl combining Greek yogurt or cottage cheese with light cream cheese until creamy.
- Incorporate protein powder into the mixture until fully combined.
- Sweeten the mixture with maple syrup or your choice of sweetener, adjusting to taste.
- Season your cheesecake with seasonal flavors like cinnamon or vanilla extract.
- Prepare an optional berry layer by slicing strawberries and tossing them in honey.
- Pour the cheesecake mixture into the prepared pan, smoothing the top.
- Bake in a preheated oven at 350°F (175°C) for 30-35 minutes, checking for a jiggly center.
- Cool the cheesecake to room temperature, then refrigerate for 3-4 hours or overnight.
- Melt ½ cup of Nutella in the microwave, drizzle over the chilled cheesecake before serving.
Notes
This cheesecake can be customized with various seasonal flavors or toppings like berries, nuts, or even a caramel drizzle for extra indulgence.
Nutrition
- Serving Size: 1 slice
- Calories: 250
- Sugar: 10g
- Sodium: 150mg
- Fat: 10g
- Saturated Fat: 4g
- Unsaturated Fat: 4g
- Trans Fat: 0g
- Carbohydrates: 30g
- Fiber: 2g
- Protein: 12g
- Cholesterol: 25mg
Keywords: protein cheesecake, Nutella cheesecake, healthy dessert, guilt-free treat, cheesecake recipe