Protein Harvest Bakery Cheesecake Jars: Quick Meal-Prep Desserts
Protein Harvest Bakery Cheesecake Jars: Your New Favorite Dessert
Hey there, fellow food lovers! Camille here, and today I’m excited to share a scrumptious treat that’s as satisfying as it is good for you: Protein Harvest Bakery Cheesecake Jars! These little wonders are perfect for a quick dessert, snack, or even breakfast when you want to add a little sweetness to your day. If you’ve ever thought that healthy eating means giving up on desserts entirely, think again! With these jars, we’ll pack in the protein while indulging that sweet tooth. Let’s dive right in!
A Sweet Slice of Nostalgia
Back in college, I had a sweet spot for late-night baking marathons with my friends. We’d whip up all sorts of goodies, and as we’d gather around to share our creations, cheesecake was a constant request. I remember one particularly lively night when we experimented with a basic cheesecake recipe, tossing in whatever we found in the fridge. Blueberries? Check! A hint of lemon zest? Why not! The joy we felt after crafting something delicious from a kitchen full of odds and ends taught me the beauty of creation.
Fast forward to today, and as I’ve honed my craft, I wanted to give that nostalgic recipe a makeover — one that not only satisfied cravings but also fueled our bodies. Enter my Protein Harvest Bakery Cheesecake Jars! They embody that same youthful creativity but with a healthy twist. Let’s get started on this fun, crunchy journey!
What You’ll Need
Here’s a quick rundown of the key ingredients you’ll need for your Protein Harvest Bakery Cheesecake Jars. I’ve included some substitution tips and insights so you can customize this recipe to fit your own pantry.
-
Greek Yogurt or Cottage Cheese
This forms the creamy base of your cheesecake. Greek yogurt is tangy and rich in protein, while cottage cheese offers a slightly different texture. If you’re dairy-free, try silken tofu for a vegan alternative! -
Protein Powder
Boosts the protein content and gives the cheesecake its signature richness. Vanilla flavor works best, but you can get creative! Look for plant-based powders if you’re avoiding whey. -
Light Cream Cheese
Adds a delightful creaminess to balance the tang. If you’re aiming for a lower-fat option, you can substitute with lower-calorie cream cheese or even almond cream cheese. -
Seasonal Flavor Ingredients
Think fresh fruits, chocolate chips, or even pumpkin puree! Choose what’s in season or whatever you have on hand to add that unique touch to your jars. -
Sweetener
Agave syrup, honey, or a sugar substitute all work well. Adjust to your taste and dietary preferences, but remember to keep it sweet enough—it’s cheesecake, after all!
With that, you’re ready to create some delicious magic!
Step-by-Step Instructions
Let’s get into the fun part! Making these cheesecake jars is a breeze, and I’m here to walk you through each step.
Step 1: Prep Your Base
- In a mixing bowl, combine 1 cup of Greek yogurt (or cottage cheese) with 1/2 cup of light cream cheese.
- Tip: Soften your cream cheese for an easier mix. Just pop it in the microwave for 10-15 seconds!
Step 2: Power Up with Protein
-
Add 1 scoop of your favorite protein powder to the bowl.
- Chef Insight: Choose a protein powder flavor that complements your jars. Vanilla is a classic, but chocolate can be a delightful twist if you’re feeling decadent!
Step 3: Sweeten the Deal
- Drizzle in 2-3 tablespoons of sweetener (to taste).
- Tip: Start with less and add more later if needed. Remember that the flavor will intensify as you chill it in the fridge!
Step 4: Flavor Infusion
- Mix in seasonal ingredients of your choice. Perhaps you want to fold in some freshly mashed strawberries, pumpkin puree, or even nut butter!
- Note: Be creative! This is where you can really play and make the recipe your own.
Step 5: Whip It Good
- Use a hand mixer or a whisk and blend everything until creamy and smooth.
- Chef Hack: (If you’re feeling fancy) fold in beaten egg whites for a fluffier texture. Just ensure that the jars are consumed quickly!
Step 6: Layer the Goodness
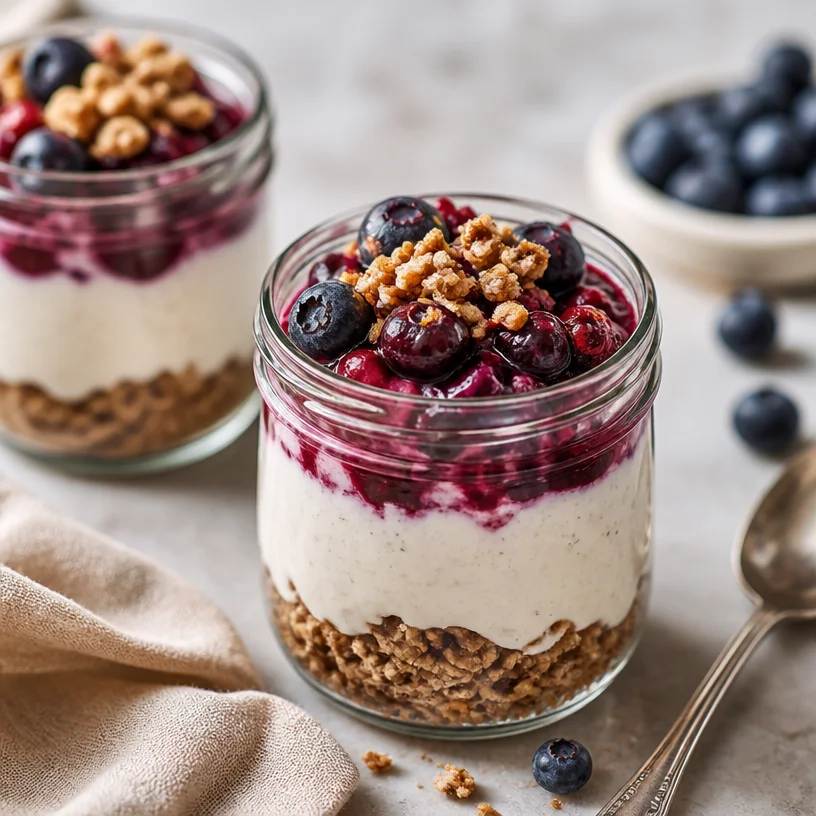
- Get ready to assemble your jars! Spoon the cheesecake mixture into mason jars or any container you like, layering with your choice of crunchy and fruity toppings.
- Suggestion: Crushed graham crackers or granola can add a satisfying crunch at the bottom layer!
Step 7: Chill Out
- Cover your jars and chill them in the refrigerator for at least 2 hours. This will set the cheesecake and allow the flavors to meld.
- Tip: They can last in the fridge for about 3-4 days if you can resist diving in sooner!
Serving Suggestions
When it comes to serving, the possibilities are endless! Here’s my recommended way to plate up those cheesecake jars:
- Garnish: Top each jar with a fresh fruit garnish — think sliced strawberries, blueberries, or a drizzle of nut butter for that extra crunch!
- Crust Options: Add more texture by sprinkling finely crushed graham crackers or nuts on top.
- Presentation: Serve them on a colorful platter, or let guests dig in as they stand around the kitchen, just like those nostalgic college days!
Recipe Variations
Let’s shake things up! Here are some fun spins and alternatives to try:
-
Chocolate Bliss: Use chocolate protein powder and swirl in some melted dark chocolate for a decadent treat.
-
Pumpkin Spice Delight: In the fall, mix in pumpkin puree and spices like cinnamon and nutmeg for an autumnal twist.
-
Tropical Paradise: Introduce some shredded coconut and diced mango for a sunny vibe.
-
Berry Medley: Swap in a mixed berry puree for added flavor and bright color.
-
Nutty Overload: Incorporate almond or peanut butter into the mixture for a protein-packed powerhouse.
Chef’s Notes
Oh, the stories I could tell about whisks gone wild and mixer malfunctions! This recipe has seriously evolved since my college days. As I experimented, I learned that keeping the ratios balanced between the creaminess and the protein is vital. The best part? You can adapt this recipe depending on your mood or what’s in your pantry. So, embrace the chaos and let your culinary creativity shine!
FAQs and Troubleshooting
Q1: Can I use any kind of protein powder?
Absolutely! Just make sure it’s a flavor you enjoy, as it will significantly impact the taste of your cheesecake.
Q2: How long will these keep in the fridge?
Your cheesecake jars will stay fresh for about 3-4 days in the refrigerator. Just remember — the longer they sit, the more the texture may change due to the moisture from the ingredients.
Q3: Can I make this vegan?
You can turn this recipe into a vegan delight by swapping Greek yogurt and cream cheese for cashew cream or silken tofu, and using a plant-based protein powder!
Q4: What can I do if the mixture is too thick?
If you find your cheesecake mixture is too thick, a splash of milk (or non-dairy alternative) can help loosen it up without losing that creaminess.
Nutritional Info
While this recipe is highly customizable, a typical serving (assuming the recipe makes about 4 jars) can contain:
- Calories: ~180
- Protein: 20g
- Carbohydrates: 14g
- Fat: 5g
(Note: Nutritional values are estimates and depend on the specific ingredients used.)
So there you have it—Protein Harvest Bakery Cheesecake Jars that are as nutritious as they are scrumptious! I hope you enjoy making these jars as much as I did while writing this post. Remember to let that creativity flow; the kitchen is your canvas! Let’s whip up something crunchy, colorful, and oh-so-delicious together. Happy cooking! 🥗✨
PrintProtein Harvest Bakery Cheesecake Jars
Healthy and protein-packed cheesecake jars that satisfy your sweet tooth without guilt.
- Prep Time: 15 minutes
- Cook Time: 0 minutes
- Total Time: 120 minutes
- Yield: 4 servings 1x
- Category: Dessert
- Method: No-Bake
- Cuisine: American
- Diet: Vegetarian
Ingredients
- 1 cup Greek yogurt or cottage cheese
- 1/2 cup light cream cheese
- 1 scoop protein powder (vanilla or chocolate)
- 2–3 tablespoons sweetener (agave syrup, honey, or sugar substitute)
- Seasonal flavor ingredients (fresh fruits, chocolate chips, or pumpkin puree)
- Crunchy toppings (crushed graham crackers or granola)
Instructions
- Combine Greek yogurt and cream cheese in a mixing bowl.
- Add protein powder to the mixture.
- Drizzle in the sweetener and mix well.
- Fold in seasonal ingredients of your choice.
- Blend everything until creamy and smooth.
- Spoon the cheesecake mixture into jars and layer with toppings.
- Chill in the refrigerator for at least 2 hours before serving.
Notes
Store in the fridge for about 3-4 days. Feel free to customize with your favorite flavors!
Nutrition
- Serving Size: 1 jar
- Calories: 180
- Sugar: 7g
- Sodium: 150mg
- Fat: 5g
- Saturated Fat: 2g
- Unsaturated Fat: 2g
- Trans Fat: 0g
- Carbohydrates: 14g
- Fiber: 2g
- Protein: 20g
- Cholesterol: 20mg
Keywords: cheesecake, healthy dessert, protein snack, no-bake dessert, customizable cheesecake