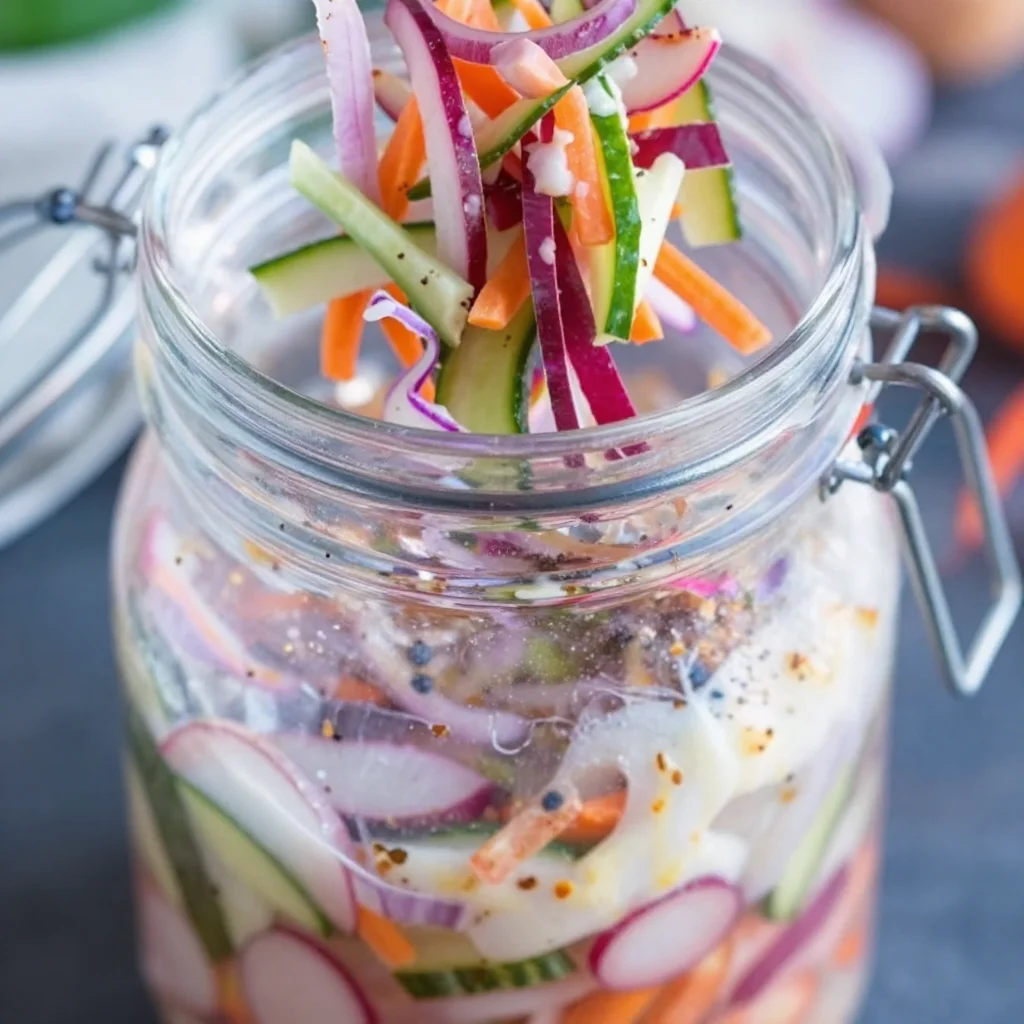
Minute Fridge Pickles: Crisp Veggies for Quick Meal Prep
Crunchy Fridge Pickled Vegetables: A Delightful Crunch in Every Bite!
Hey there, food lovers! 🌟 I’m super excited to share one of my favorite quick recipes that will add zing to any meal: Quick Fridge Pickled Vegetables! If you’ve been hanging around Crunchy Table for a while, you know I’m all about that satisfying crunch and vibrant flavors. And let me tell you, these pickled veggies tick all the boxes for me!
A Personal Story: A Trip Down Memory Lane
Let me take you back to a warm summer day when I was a kid, standing beside my grandma in her sunny kitchen. The aromas of spices and vinegars danced in the air as she pulled out colorful veggies from her garden. “We’re going to make pickles today, sweetheart!” she declared, her eyes twinkling with excitement.
As we julienned carrots, sliced cucumbers, and diced radishes, I watched her move with such confidence. Every slice was a tiny explosion of color on our countertop and a promise of crunchiness to come. She taught me that a great pickle doesn’t just preserve vegetables but elevates them, turning humble ingredients into zesty sidekicks for any dish. By the time the jars cooled on the counter, our kitchen was filled with the most magical tang.
Fast forward years later, and here I am, sharing my version of that childhood joy with you! Quick fridge-pickled vegetables are not just a way to preserve veggies; they add a burst of flavor to salads, sandwiches, and so much more. Let’s dive into making this delightful crunch!
The Ingredients
Here’s what you’ll need to whip up your own fridge-pickled vegetables:
-
2 Carrots, julienned: Carrots contribute a lovely sweetness and crunch. If you’re in a pinch, you could swap them with bell peppers for a different flavor.
-
1 Cucumber, sliced: Fresh cucumbers bring a delightful crunch. You could use a pickling cucumber or substitute with zucchini for a unique twist.
-
1 Radish, sliced: Radishes pack a peppery punch! If you’re not a fan, you can easily swap them out for more cucumbers or even sliced jalapeños for heat.
-
1 Onion, thinly sliced: Any onion will do, but red onions add a beautiful color and mild flavor. If onions aren’t your thing, try shallots or scallions.
-
1 Cup Vinegar (white or apple cider): Vinegar is essential for the pickling magic! Apple cider vinegar lends a fruity flavor, but feel free to use rice vinegar for a milder taste.
-
1 Cup Water: Balances out the vinegar to create a perfect brine.
-
2 Tablespoons Sugar: A touch of sweetness counters the acidity. Honey or agave syrup can work as excellent substitutes!
-
1 Tablespoon Salt: Helps enhance the flavors. If you’re cutting back on sodium, try reducing it to ½ tablespoon.
-
1 Teaspoon Spices (optional): This is where you can get creative! Mustard seeds, peppercorns, or even red pepper flakes can add exciting notes to your pickle mix.
Step-by-Step Instructions
Are you ready? Let’s roll up our sleeves and get pickling!
-
Prepare Your Veggies: Start by washing and slicing your vegetables as mentioned in the ingredients. Remember to julienne the carrots for that perfect crunch and thinly slice the onion so they mingle easily in the brine.
Chef Tip: Use a mandoline slicer for uniform cuts—this not only looks beautiful but ensures even pickling!
-
Mix the Brine: In a medium saucepan, combine the vinegar, water, sugar, and salt. Stir it well to dissolve the sugar and salt.
Little Chef Hack: Heat the mixture over low heat; warming the brine helps to dissolve the sugar faster. Just make sure not to boil it!
-
Add the Spices: Throw in your chosen spices (if using) for an extra flavor kick. This is where your personal touch comes in!
-
Combine Veggies and Brine: In a clean glass jar, layer the sliced veggies neatly. Pour the warm brine over the vegetables until they’re completely submerged.
Fun Fact: The veggies will float, but that’s okay! Just give them a little push down or use a clean weight to keep them submerged.
-
Seal and Chill: Let the jar cool to room temperature, then seal it tightly and tuck it in the fridge.
Chef Insight: These pickles taste best after at least 24 hours, but if you can’t wait, they’ll still be delicious fresh!
-
Enjoy: Your quick pickled vegetables are ready to jazz up any dish! Just remember to keep them chilled, and they should last up to two weeks in the fridge (if they last that long!).
Serving Suggestions
When serving these tangy beauties, the sky’s the limit! Here are a few ideas to get you started:
-
Topping for Bowls: Sprinkle these pickles atop your favorite grain or salad bowls for that zest and crunch factor.
-
Sandwich Boost: Layer them inside sandwiches or wraps for a punchy contrast to creamy spreads.
-
Charcuterie Star: Arrange them on a charcuterie board; they add vibrant color and a delightful crunch alongside meats and cheeses.
-
Tacos and Quesadillas: Pickles make a fantastic addition to tacos and quesadillas, enhancing every bite with crunch and flavor!
Recipe Variations
Now that you’ve got the basic recipe down, let’s shake things up a bit! Here are some tasty variations you can try:
-
Spicy Kick: Add sliced jalapeños or a dash of red pepper flakes for a fiery version.
-
Herb-Infused: Toss in fresh herbs like dill or cilantro in the jar for an aromatic twist.
-
Mediterranean Style: Use lemon juice instead of vinegar and toss in some olives for a Mediterranean flair.
-
Sweet & Sour Heaven: Swap half the sugar for honey or maple syrup for a lovely sweetness that complements savory dishes.
-
Asian-Style: Use rice vinegar and add sesame seeds and sliced ginger for an Asian-inspired burst of flavor.
Chef’s Notes
As with any recipe, feel free to play around and make it your own! My fridge-pickled vegetables have evolved over the years, from basic carrot and cucumber to a colorful rainbow of veggies. Each batch tells a story and carries different memories—just like that summer day in my grandma’s kitchen.
Funny Kitchen Story: I once accidentally grabbed a bottle of apple flavoring instead of apple cider vinegar for pickles—let’s just say the taste was… an interesting experiment! Always double-check your ingredients, friends!
FAQs and Troubleshooting
1. Can I use other vegetables?
Absolutely! Feel free to pickle any crisp veggies, like bell peppers, cauliflower, or asparagus. Experimenting is half the fun!
2. How long do they last?
These pickles typically last about two weeks in the fridge, thanks to the acidity of the vinegar. Just ensure they stay submerged in the brine!
3. My pickled veggies are too salty! What went wrong?
If the balance feels off, it may be due to the salt concentration in the brine. Always try to stick to the measurements provided, and remember you can adjust the salt in future batches.
4. Can I can these for longer storage?
This quick pickling method is best for short-term storage in the fridge. If you’re looking to preserve them for months, consider water bath canning. Just make sure you follow proper canning procedures!
Nutritional Info (Optional)
While I typically focus on flavors rather than nutrition stats, here’s a fun glimpse:
- Serving Size: 1/2 cup
- Calories: Approx. 25
- Carbs: 5g
- Sugar: 2g
- Fiber: 1g
- Protein: 1g
Now, that’s a delicious guilt-free topping you can enjoy without worries!
Final Thoughts
There you have it! A crunchy, colorful take on fridge pickled vegetables that’s easy, approachable, and flavorful. I can’t wait for you to try this recipe and bring an extra zing to your meals. Remember, the kitchen is your playground, so have fun, embrace the crunch, and experiment to find your perfect pickle flavor!
Happy cooking, and let’s keep making magic happen in the kitchen! 🥦✨
— Camille
PrintCrunchy Fridge Pickled Vegetables
Quick fridge pickled vegetables that add a delightful crunch and burst of flavor to salads, sandwiches, and more.
- Prep Time: 15 minutes
- Cook Time: 10 minutes
- Total Time: 25 minutes
- Yield: 4 servings 1x
- Category: Condiment
- Method: Pickling
- Cuisine: American
- Diet: Vegetarian
Ingredients
- 2 Carrots, julienned
- 1 Cucumber, sliced
- 1 Radish, sliced
- 1 Onion, thinly sliced
- 1 Cup Vinegar (white or apple cider)
- 1 Cup Water
- 2 Tablespoons Sugar
- 1 Tablespoon Salt
- 1 Teaspoon Spices (optional)
Instructions
- Prepare your veggies by washing and slicing them as mentioned in the ingredients.
- Mix the brine by combining the vinegar, water, sugar, and salt in a medium saucepan. Stir to dissolve.
- Add the spices if using, for extra flavor.
- Combine the veggies and brine in a clean glass jar, layering the vegetables and pouring the warm brine over them.
- Seal and chill the jar in the fridge after it cools.
- Enjoy your pickles after at least 24 hours for best flavor.
Notes
These pickles last about two weeks in the fridge. Experiment with different vegetables for variety!
Nutrition
- Serving Size: 1/2 cup
- Calories: 25
- Sugar: 2g
- Sodium: 600mg
- Fat: 0g
- Saturated Fat: 0g
- Unsaturated Fat: 0g
- Trans Fat: 0g
- Carbohydrates: 5g
- Fiber: 1g
- Protein: 1g
- Cholesterol: 0mg
Keywords: pickled vegetables, quick pickles, fridge pickles, crunchy veggies, easy condiments