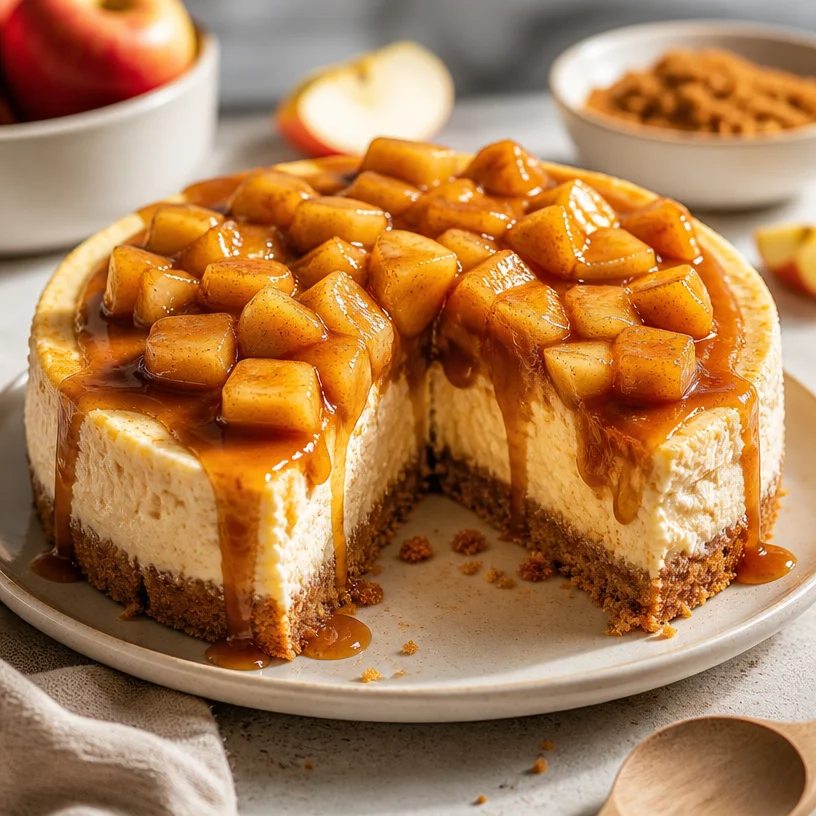
Ingredient Protein Disney Caramel Apple Cheesecake Recipe
Protein Disney Caramel Apple Cheesecake: A Crunchy Adventure
Hey there, fellow foodies! Welcome back to the Crunchy Table, where we celebrate meals that are vibrant, full of flavor, and just downright fun! Today, I couldn’t be more excited to share a recipe that combines the whimsy of Disney magic with the delightful crunch of an indulgent dessert – the Protein Disney Caramel Apple Cheesecake. It’s not just a feast for your taste buds but a nostalgic journey that will make you feel like a kid again. So, grab your apron, and let’s make some magic together!
A Slice of Nostalgia
When I think back to my childhood, one of my fondest memories is visiting the charming streets of Disneyland with my family. The scent of caramel wafted through the air as we strolled past stands filled with sweet treats. I still remember drooling over those iconic caramel apples, coated with various toppings. They were a deliciously sticky, crunchy mess that always put a smile on my face.
Fast forward to today, and I’m blending that nostalgic caramel goodness with a healthier spin to create this Protein Disney Caramel Apple Cheesecake! Light yet satisfying, this cheesecake is perfect if you’re looking for a way to indulge without the guilt, all while getting a protein boost. It’s time to channel your inner magician and whip up this delightful dessert!
Ingredients
Here’s what you’ll need to create this scrumptious cheesecake:
-
1 cup Greek yogurt or cottage cheese
Both options provide a creamy texture. Greek yogurt is tangy and pairs incredibly well with the caramel, while cottage cheese gives a lovely texture if you prefer a chunkier bite. If you’re lactose intolerant, look for dairy-free alternatives like almond or coconut yogurt! -
2 scoops protein powder
Choose your favorite flavor for an extra twist. Vanilla or caramel will work beautifully! You can also use plant-based protein powder if you prefer. For a lower-calorie option, check for sugar-free versions. -
8 oz light cream cheese
This adds richness without being overly heavy. Use the full-fat variety for a creamier texture or swap for a vegan cream cheese if you’re looking for a dairy-free option. -
Seasonal flavor ingredients
This could include cinnamon for that fall vibe, or a splash of vanilla extract. Feel free to get creative depending on what’s in season! -
Sweetener of your choice
Honey, agave, or a zero-calorie sweetener like stevia will work. Adjust according to your taste preferences!
Step-by-Step Instructions
Now that we have our ingredients ready, let’s dive into the fun part – cooking! Follow these step-by-step instructions for a cheesecake that’s sure to impress.
-
Preparation:
Preheat your oven to 325°F (165°C). While it warms up, grab an 8-inch springform pan and lightly grease it. This will ensure your cheesecake doesn’t stick. -
Blend the Base:
In a mixing bowl, combine the Greek yogurt (or cottage cheese), protein powder, and light cream cheese. Blend until smooth. Tip: Using room temperature cream cheese helps to prevent any lumps, giving you that silky texture! -
Sweeten the Deal:
Add in your sweetener and seasonal flavor ingredients. Adjust the sweetness to taste. Chef hack: Always start with less sweetener; you can add more, but you can’t take it out! -
Pour and Smooth:
Pour the mixture into your greased springform pan, smoothing the top with a spatula. Extra tip: For a fancy finish, use a spatula to create a swirl pattern on top. -
Bake:
Place the cheesecake in the oven and bake for about 30-35 minutes, or until the edges are set and the center is slightly jiggly. It’s okay to have a little wobble; it will firm up as it cools. Funny story: I once overbaked my cheesecake and ended up with a not-so-pleasant rubber texture. Lesson learned – keep an eye on it! -
Cool Down:
Once done, turn off the oven and crack the door open. Let the cheesecake cool inside for about an hour. This prevents cracking on the top. -
Refrigerate:
Transfer your cheesecake to the fridge and let it chill for at least 3 hours or overnight for the best flavor and texture. -
Serve with a Drizzle:
Before serving, melt some caramel sauce (store-bought or homemade) and drizzle it over the top. Pro tip: To make it even crunchier, top with crushed nuts or granola before drizzling on the caramel!
Serving Suggestions
When it’s finally time to serve this masterpiece, consider these presentation ideas:
- Chilled Slices: Serve each slice chilled with a scoop of light whipped cream on the side for a touch of luxury.
- Garnish: Top with fresh apple slices or a sprinkle of cinnamon for that added flair.
- Family Style: Present the cheesecake as a whole with a caramel drizzle, and let everyone slice their own piece.
Recipe Variations
Feeling adventurous? Here are some fun twists you can add to this recipe:
- Chocolate Lover’s Twist: Add cocoa powder to the filling for a chocolatey version!
- Berry Bliss: Swirl in some fresh berries or berry compote to brighten up flavors and colors.
- Pumpkin Spice: Perfect for fall—add pumpkin puree and pumpkin spice for the ultimate autumnal treat!
- Nutty Crunch: Mix crushed nuts (like pecans or almonds) into the batter for extra texture, and sprinkle more on top before serving.
- Caramel Swirl: Instead of just drizzling on top, swirl in melted caramel into the filling before baking for a marbled effect.
Chef’s Notes
As I’ve experimented with this recipe, I’ve discovered so much fun around protein-packed ingredients! Initially, I thought the protein powder would make the cheesecake taste chalky, but blending it just right created such a delightful texture. Many of my friends have tried this recipe and fallen in love with how indulgent it tastes without all the excess calories.
Also, don’t sleep on the leftovers – this cheesecake tastes even better the next day as the flavors meld together beautifully! I was once hesitant to save dessert, thinking it wouldn’t last. Spoiler alert – it totally does, and it’s a delightful midnight snack!
FAQs and Troubleshooting
1. My cheesecake cracked. What did I do wrong?
Cracking often occurs due to sudden temperature changes. Make sure to let the cheesecake cool in the oven with the door open for a bit before transferring to the fridge.
2. Can I use a different type of sweetener?
Absolutely! Play around with what you have on hand. Just make sure to adjust the quantity based on the sweetener’s potency, especially with stevia or erythritol.
3. What if my cheesecake is too runny?
Make sure to check that it’s fully baked. If you find it’s still not setting, try adding a touch of cornstarch next time to help firm up the filling during baking.
4. Can I freeze the leftovers?
Yes, you can freeze your cheesecake! Wrap it tightly in plastic wrap and aluminum foil. Just remember to let it thaw in the fridge for a few hours before serving.
Nutritional Info (per slice, based on 8 slices)
- Calories: Approximately 150
- Protein: 15g
- Carbs: 15g
- Fat: 5g
This Protein Disney Caramel Apple Cheesecake isn’t just a dessert; it’s a delightful experience that takes you back to sweet childhood memories while keeping your health goals in mind. I hope you enjoyed this journey into flavor and nostalgia as much as I’ve loved sharing it with you!
Let’s keep the kitchen magic alive, and remember—every meal is an opportunity to create joy and share love. Until next time, stay crunchy and delicious! 🥗✨
— Camille 🥬🥑✨
PrintProtein Disney Caramel Apple Cheesecake
A delightful protein-packed cheesecake combining the nostalgic flavors of caramel apples with a healthier twist.
- Prep Time: 15 minutes
- Cook Time: 35 minutes
- Total Time: 180 minutes
- Yield: 8 servings 1x
- Category: Dessert
- Method: Baking
- Cuisine: American
- Diet: Protein-rich
Ingredients
- 1 cup Greek yogurt or cottage cheese
- 2 scoops protein powder (vanilla or caramel)
- 8 oz light cream cheese
- Seasonal flavor ingredients (like cinnamon or vanilla extract)
- Sweetener of your choice (honey, agave, or stevia)
Instructions
- Preheat your oven to 325°F (165°C) and grease an 8-inch springform pan.
- Combine the Greek yogurt (or cottage cheese), protein powder, and cream cheese in a mixing bowl and blend until smooth.
- Add your sweetener and seasonal flavor ingredients, adjusting to taste.
- Pour the mixture into the greased pan and smooth the top with a spatula.
- Bake for about 30-35 minutes, until the edges are set and the center is slightly jiggly.
- Cool the cheesecake inside the oven with the door cracked for about an hour.
- Refrigerate the cheesecake for at least 3 hours or overnight.
- Serve with a drizzle of caramel sauce and a sprinkle of crushed nuts or granola.
Notes
This cheesecake tastes even better the next day as flavors meld together. Leftovers can be frozen and enjoyed later.
Nutrition
- Serving Size: 1 slice
- Calories: 150
- Sugar: 5g
- Sodium: 200mg
- Fat: 5g
- Saturated Fat: 2g
- Unsaturated Fat: 2g
- Trans Fat: 0g
- Carbohydrates: 15g
- Fiber: 1g
- Protein: 15g
- Cholesterol: 20mg
Keywords: cheesecake, protein dessert, caramel apple, healthy dessert, nostalgic flavors