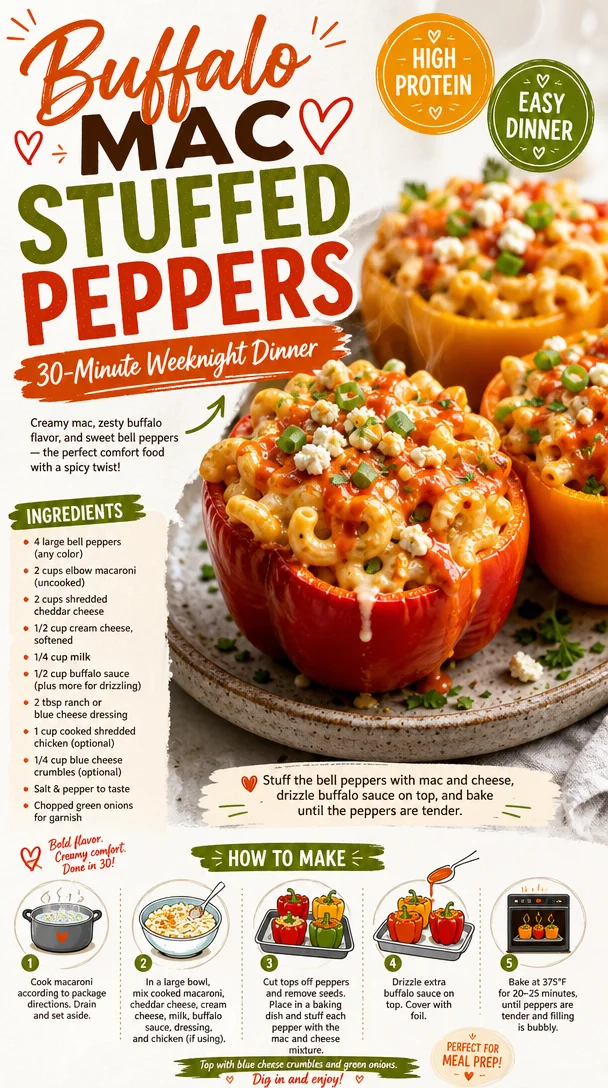
Buffalo Mac Stuffed Peppers: 30-Minute Weeknight Dinner
Buffalo Mac Stuffed Peppers: A Crunchy, Cheesy Adventure!
Hey there, fellow foodies! 🌟 Today, we’re diving into a fun, flavor-packed dish that’s sure to get your taste buds tingling: Buffalo Mac Stuffed Peppers! Trust me, once you bite into one of these delightful creations, you’ll be throwing a party of flavor in your mouth. Get your forks ready because we’re turning the comfort of mac and cheese into a crispy, crunchy adventure!
A Little Nostalgia
Let me take you down memory lane for a second. Growing up, mac and cheese was always a staple in our household. I remember coming home from school, feeling a little worn out, and the moment I walked into the kitchen, I could smell that familiar, cheesy goodness bubbling away. My mom would make the creamiest mac and cheese—flaky golden breadcrumbs on top, reminiscent of a cozy hug.
Now, add the spicy kick of Buffalo sauce, and it’s like turning your comforting mac into a bold, adventurous dish. I vividly remember the first time I mixed my beloved mac with a hint of Buffalo heat—let’s just say it was love at first bite! So today, I’m excited to share how to take that classic mac and cheese and give it a crunchy twist, stuffed into vibrant bell peppers for a dish that’s as beautiful as it is delicious.
Ingredients
Let’s gather our ingredients! Here’s what you’ll need to create these Buffalo Mac Stuffed Peppers:
-
Mac and Cheese: The star of our dish! Use your favorite homemade recipe or a quality store-bought version. If you want a healthier twist, opt for whole-grain pasta for some extra fiber.
-
Bell Peppers: I prefer using vibrant red and yellow peppers for their sweetness and aesthetics, but green or orange peppers work just as well! They add a delightful crunch and can be substituted with zucchini or larger mushrooms if you’re feeling adventurous.
-
Buffalo Sauce: The magic ingredient that’ll take this dish to the next level. You can use your favorite store-bought sauce or try making your own! If spice isn’t your thing, feel free to reduce the amount or swap it out for a mild BBQ sauce.
-
Cheese (optional): Yes, more cheese! A sprinkle of cheddar or mozzarella on top adds an irresistible gooeyness. Vegan cheese can easily be used for a dairy-free option.
-
Green Onions: For that fresh crunch and a pop of flavor. You can substitute them with chives or sautéed leeks for a different twist.
-
Breadcrumbs: A crunchy topping is a must! You can use panko for extra crunchiness, or gluten-free breadcrumbs if you’re avoiding gluten. You can even skip them for a lighter version.
Step-by-Step Instructions
Now that we’ve got our ingredients, it’s time to cook up some magic! Ready? Let’s do it!
-
Preheat the Oven: Preheat your oven to 375°F (190°C). This ensures everything bakes evenly and gets that golden top we all crave.
-
Prep the Peppers:
- Grab your bell peppers and slice them in half lengthwise, removing the seeds and ribs inside. Arrange them cut-side up on a baking sheet.
- Chef Tip: Don’t worry if they wobble a bit; you can secure them with crumpled foil underneath to keep them steady.
-
Prepare the Mac and Cheese:
- If you’re using store-bought mac and cheese, heat it according to the package instructions. For homemade, prepare your creamy goodness as you typically would.
- Once it’s cooked, stir in a generous splash of Buffalo sauce. Adjust the spice level to taste—after all, we want to keep that perfect balance of heat and cheesy goodness.
-
Stuff Those Peppers:
- Generously pile the Buffalo mac and cheese into each pepper half. You want them stuffed to the brim! It’s fine to overstuff a bit; it adds character!
- Chef Hack: If you have leftover mac and cheese, don’t fret! It makes a great side dish or lunch the next day!
-
Sprinkle with Cheese & Breadcrumbs:
- Top each pepper with a sprinkle of cheese (if you’re using it) followed by the breadcrumbs, making sure every nook is covered for that crunchy finish.
-
Bake to Perfection:
- Place the baking sheet in the oven and let those beauties bake for about 25-30 minutes, or until the peppers are tender and the tops are golden-brown.
- Fun Fact: If you want a super crispy top, broil them for the last 2-3 minutes, but keep a careful eye on them!
-
Garnish and Serve:
- Once they’re out of the oven, set them aside to cool for a few minutes. Then, garnish with sliced green onions (or any herbs you fancy) before serving.
Serving Suggestions
Wondering how best to plate these playful peppers? Here are a few fun ideas:
- On a Bed of Greens: Serve them on a colorful bed of mixed greens or arugula. The freshness of the greens balances out the richness of the mac and cheese wonderfully!
- Dipping Sauce: Consider offering a side of extra Buffalo sauce or ranch dressing for those who love a little extra dipping fun.
- Garnish Galore: Experiment with garnishes! Sprinkle some crumbled blue cheese on top or add some sliced avocado for creaminess.
Recipe Variations
Feeling adventurous? Here are a few creative twists to make this recipe even more exciting:
-
Veggie-Packed: Mix in some sautéed veggies like spinach, mushrooms, or zucchini into your mac before stuffing to sneak in some extra nutrients!
-
Sweet and Spicy: Add a dash of honey or maple syrup to your Buffalo sauce for a sweet kick. It creates a lovely contrast against the spice!
-
Cheesy Broccoli Mac: Add steamed broccoli to your mac and cheese for a veggie boost. It’ll be a crunchy delight!
-
Taco Twist: Swap the Buffalo sauce for taco seasoning, and mix in corn and black beans for a bold take that screams fiesta!
-
Cauliflower Mac: For a lighter version, use cauliflower instead of pasta! Just roast the cauliflower until tender, then mix with cheese and Buffalo sauce.
Chef’s Notes
Let me share a little secret: This dish has evolved in my kitchen! What started as a quick weeknight dinner has transformed into a go-to party appetizer and a tailgating favorite. I love how versatile it is; you can really get creative with the fillings and sauces.
Oh, and speaking of creativity, the other week, I had a little mishap where I tried to add too much Buffalo sauce. Let’s just say my nose could’ve developed a love-hate relationship with spicy foods! 😂 Lesson learned: moderation is key!
FAQs and Troubleshooting
1. My peppers are too crunchy. How can I soften them?
If your peppers come out too crunchy, it’s all in the bake time! You can pre-roast the pepper halves for about 10 minutes before stuffing them. This softens them up nicely and allows them to finish cooking with the stuffing.
2. Can I make these ahead of time?
Absolutely! Make everything up to the point of baking, cover with foil, and store them in the fridge for up to 24 hours. When you’re ready, just pop them in the oven straight from the fridge, adding a few extra minutes to the bake time.
3. What’s the best way to store leftovers?
Store any leftover stuffed peppers in an airtight container in the fridge for up to 3 days. Reheat them in the oven to keep that crunchy topping intact, or use the microwave if you’re short on time.
4. Can I freeze these?
Yes! Before baking, wrap each stuffed pepper tightly in foil and store them in a freezer-safe bag. When you’re ready to eat, let them thaw in the fridge overnight, then bake as directed.
Nutritional Info
While I don’t provide specific nutrition information for every recipe, I can share that these Buffalo Mac Stuffed Peppers bring a hearty combination of protein (thanks to the mac and cheese) and fiber (with the peppers). Plus, they’re a fun way to enjoy veggies while keeping things indulgent.
So there you have it, my fellow foodies! Buffalo Mac Stuffed Peppers are not just a meal; they’re an experience. Get ready for a burst of flavor, a satisfying crunch, and a trip down memory lane. Happy cooking, and may your kitchen adventures always be delicious! 🥳🥗✨
Let’s grab those peppers and get crunchy!
PrintBuffalo Mac Stuffed Peppers

A flavor-packed dish that combines the comfort of mac and cheese with the boldness of Buffalo sauce, all stuffed into crunchy bell peppers.
- Prep Time: 20 minutes
- Cook Time: 30 minutes
- Total Time: 50 minutes
- Yield: 4 servings
- Category: Main Course
- Method: Baking
- Cuisine: American
- Diet: Vegetarian
Ingredients
- Mac and Cheese (homemade or store-bought)
- Bell Peppers (red, yellow, green, or orange)
- Buffalo Sauce
- Cheese (optional; cheddar or mozzarella)
- Green Onions
- Breadcrumbs (panko or gluten-free)
Instructions
- Preheat the oven to 375°F (190°C).
- Prep the bell peppers by slicing them in half and removing the seeds and ribs.
- Prepare the mac and cheese according to package instructions or your own recipe.
- Stuff each pepper half with the Buffalo mac and cheese mixture.
- Sprinkle cheese and breadcrumbs on top of each stuffed pepper.
- Bake for about 25-30 minutes, until the peppers are tender and the tops are golden-brown.
- Garnish with sliced green onions before serving.
Notes
You can make these ahead of time and store in the fridge or freeze before baking. For a lighter version, try using cauliflower instead of pasta.
Nutrition
- Serving Size: 1 stuffed pepper
- Calories: 400
- Sugar: 6g
- Sodium: 700mg
- Fat: 16g
- Saturated Fat: 6g
- Unsaturated Fat: 8g
- Trans Fat: 0g
- Carbohydrates: 52g
- Fiber: 4g
- Protein: 18g
- Cholesterol: 40mg
Keywords: stuffed peppers, mac and cheese, buffalo sauce, vegetarian recipe