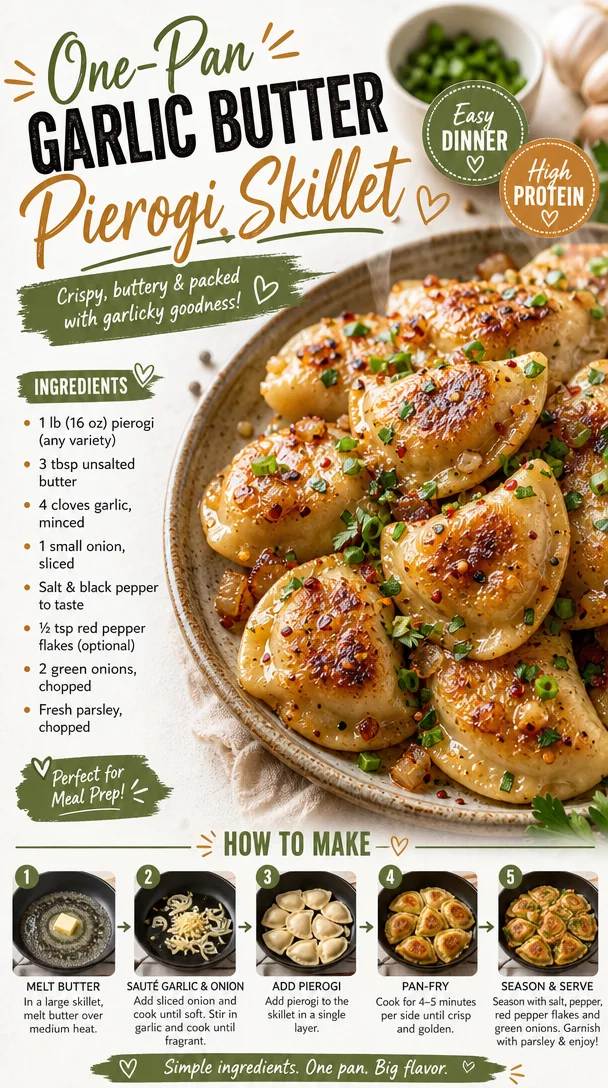
One-Pan Garlic Butter Pierogi Skillet
Garlic Butter Pierogi Skillet: A Comfort Food Classic with a Crunchy Twist
Hey friends! Today, we’re diving into a dish that’s close to my heart: Garlic Butter Pierogi Skillet. This dish is not just delicious; it’s a nostalgia-filled, comforting hug for your taste buds. Picture this: golden, crispy pierogi tossed in a rich, buttery garlic sauce, making every bite an adventure. Whether you’re a seasoned chef or a kitchen novice, this recipe is here to make you the star of your own culinary show.
Let’s get cooking!
Personal Story
Growing up, my family had a tradition of making pierogi for special occasions. I remember one winter night, the whole house was filled with the warm aroma of buttery garlic as my grandmother cooked her famous pierogi. It was a flaky, happy chaos as we rolled out dough, filled them with creamy potatoes, and debated over whether we wanted sautéed onions or extra cheese. Those cozy family gatherings, filled with laughter and the clinking of forks, are some of my fondest memories.
As I got older and began to experiment in my own kitchen, I wanted to take that nostalgic dish and give it a little crunchy twist. And thus, the Garlic Butter Pierogi Skillet was born! It’s not just a meal; it’s a celebration of those memories, garnished with rich flavors and a sprinkle of love. So let’s relive that moment together—grab your apron, and let’s make some magic!
Ingredients
- Pierogi
- About: These delightful dumplings come in various fillings—potato, cheese, sauerkraut, or even sweet options like fruit. Feel free to use frozen, store-bought pierogi for convenience, or make your own if you’re feeling adventurous.
- Substitution Tips: If pierogi isn’t your jam, you can use gnocchi as an alternative!
- Chef Insight: Fresh or frozen, pierogi is perfect for freezing—just layer between parchment paper, and you can always have some on hand!
- Butter
- About: Butter is the key to achieving that velvety sauce that’ll cling to the pierogi and make them shine.
- Substitution Tips: You can swap butter for olive oil or vegan butter if you’re looking for a dairy-free option.
- Chef Insight: For a fun twist, try using flavored butter, like garlic herb or chili butter!
- Garlic
- About: Fresh garlic adds that aromatic punch, filling your kitchen with irresistible scents.
- Substitution Tips: Don’t have fresh garlic? Garlic powder can do the trick, but use less—about 1/4 teaspoon for every clove.
- Chef Insight: Feel free to add a hint of garlic powder for extra depth when sautéing!
Step-by-Step Instructions
- Cook the Pierogi
- Start by boiling your pierogi according to the package instructions (usually about 3–5 minutes). This will soft cook them, ensuring they are fluffy in the middle and ready to take on that garlic butter flavor.
- Tip: Keep a close eye! They’ll float to the top when they’re done.
- Drain and Dry
- Once they’re cooked, drain the pierogi in a colander and let them sit for a few minutes to dry. This helps them get crispy later when you sauté them.
- Chef Hack: For extra crunch, let them cool slightly before sautéing!
- Heat the Butter
- In a large skillet, melt 4 tablespoons of butter over medium heat. Let it get bubbly but be careful not to let it burn!
- Tip: Swirling the pan while the butter melts will enhance that nutty flavor.
- Sauté the Garlic
- Add 4 cloves of minced garlic to the butter. Sauté for about 30 seconds until the garlic is fragrant. Be sure not to burn it, as burnt garlic is bitter!
- Chef Insight: If you want a little extra spice, add a pinch of red pepper flakes for a kick!
- Add the Pierogi
- Toss the drained pierogi into the skillet, coating them in the garlic butter. Let them cook for about 5–7 minutes until they’re golden and crispy on the outside.
- Tip: Avoid overcrowding the skillet for the best crispiness—work in batches if needed!
- Garnish and Serve
- Once they’re beautifully browned, remove the skillet from the heat. Feel free to garnish with freshly chopped parsley or scallions for a pop of color and freshness.
- Give the pierogi a gentle toss to mix in the garlic butter before serving.
- Chef Note: Adding a squeeze of lemon juice right before serving brings the flavors into perfect balance!
Serving Suggestions
To plate this dish, you can use a large serving dish or individual plates. For added flair, sprinkle some crispy fried onions or bacon on top for a savory crunch. Serve with a side of sour cream or a tangy dipping sauce for a delicious contrast.
Recipe Variations
Here are some fun ways to give your Garlic Butter Pierogi Skillet a twist:
- Cheesy Spin: Sprinkle with shredded cheddar or mozzarella for an ooey-gooey experience!
- Veggie Lover’s Delight: Add in sautéed spinach, mushrooms, and cherry tomatoes for extra veggies and color.
- Meat It Up: Toss in some cooked sausage or diced chicken for protein-packed goodness.
- Spicy Garlic: Infuse the butter with spicy garlic oil for a fiery kick.
- Vegan Version: Use vegan butter and mushroom-filled pierogi to make it plant-based while still being satisfying!
Chef’s Notes
This recipe has evolved from my grandmother’s traditional method over the years. I love experimenting with different fillings and toppings, making it a versatile kitchen staple. One time, I accidentally overcooked my garlic in the skillet—what resulted was a surprisingly smoky flavor that I now sometimes purposely try to replicate! Cooking is all about learning, adapting, and having fun, so don’t be afraid to make it your own.
FAQs and Troubleshooting
Q1: Why did my pierogi stick to the skillet?
- Make sure your skillet is well-coated in butter before adding the pierogi. Heating it properly also helps prevent sticking.
Q2: Can I use frozen pierogi directly in the skillet?
- Yes, but it’s best to boil them first, as this ensures they cook evenly and stay fluffy on the inside.
Q3: How can I make this dish gluten-free?
- You can use gluten-free pierogi or gnocchi, which can often be found at local grocery stores.
Q4: How do I store leftovers?
- Store them in an airtight container in the fridge for 2–3 days. Reheat in a skillet over medium heat for the best results.
Nutritional Info
While I don’t like to focus only on numbers, here’s a quick glance:
- Calories: Approximately 350 per serving (based on 1/2 cup of pierogi with butter and garlic)
- Carbohydrates: About 40g
- Protein: 8g
- Fat: 18g
- Fiber: 2g
There you have it—your ultimate guide to creating a delicious Garlic Butter Pierogi Skillet! This dish is not only an explosion of flavor, but it also serves as a lovely reminder of shared meals and cherished memories. I can’t wait for you to try it! Don’t forget to share your own twists and experiences in the comments. Happy cooking!
— Camille 🥗✨
PrintGarlic Butter Pierogi Skillet

A nostalgia-filled, comforting dish featuring crispy pierogi tossed in a rich buttery garlic sauce.
- Prep Time: 10 minutes
- Cook Time: 20 minutes
- Total Time: 30 minutes
- Yield: 4 servings 1x
- Category: Main Course
- Method: Sautéing
- Cuisine: Eastern European
- Diet: Vegetarian
Ingredients
- Frozen or homemade pierogi
- 4 tablespoons of butter
- 4 cloves of garlic, minced
- Fresh parsley or scallions for garnish
- Lemon juice (optional)
- Red pepper flakes (optional)
Instructions
- Cook the pierogi according to package instructions (3–5 minutes) until they float.
- Drain the pierogi in a colander and let dry for a few minutes.
- Heat the butter in a large skillet over medium heat until bubbly, being careful not to burn it.
- Sauté the garlic in the melted butter for about 30 seconds until fragrant.
- Add the drained pierogi to the skillet and cook for 5–7 minutes until golden and crispy.
- Garnish with parsley or scallions and toss gently before serving.
Notes
To enhance the flavor, add lemon juice just before serving. For a twist, consider adding cheese or sautéed vegetables.
Nutrition
- Serving Size: 1 serving
- Calories: 350
- Sugar: 3g
- Sodium: 400mg
- Fat: 18g
- Saturated Fat: 10g
- Unsaturated Fat: 8g
- Trans Fat: 0g
- Carbohydrates: 40g
- Fiber: 2g
- Protein: 8g
- Cholesterol: 30mg
Keywords: pierogi, garlic butter, skillet, comfort food, vegetarian